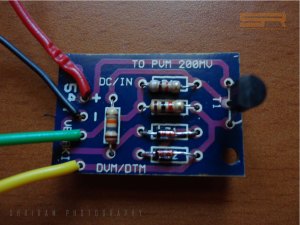
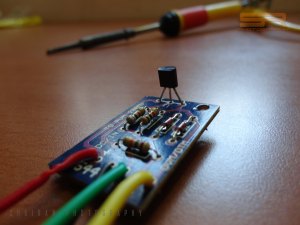
Formally announcing the success of my latest project ‘A DIGITAL THERMOMETER using the famous temperature sensor from National Semiconductor LM35. This is actually a small circuit in which the temperature sensor senses the temperature and the circuit converts the temperature into an equivalent voltage which can be read by connecting the circuit to a Digital Multimeter [DMM].This can sense the room temperature and can be connected to a DMM for the output. This circuit converts temperature into a corresponding voltage i.e., for every degree of the temperature increase the output increases by 1 mV VDC. It uses a 3 lead LM 35 Temperature Sensor.
Connect the output wires to the DMM and set the multimeter for the DC measurement at 200 mV. The output displayed here will be the direct digital conversion of the actual temperature of the room.
This Thermometer finds numerous applications in our daily life, for example, we can measure our body temperature very accurately using this circuit the display reads 37 degree Celsius . Which is more or less perfect, it can sense temperatures form -55 Degree Celsius to +150 Degree Celsius.
Here is the link to the datasheet of the National Semiconductor LM 35 Temperature sensor http://pdf1.alldatasheet.com/datasheet-pdf/view/8866/NSC/LM35.html
A sneak peek into the datasheet of the sensor :
LM35
Precision Centigrade Temperature Sensors
General Description
The LM35 series are precision integrated-circuit temperature sensors, whose output voltage is linearly proportional to the Celsius (Centigrade) temperature. The LM35 thus has an advantage over linear temperature sensors calibrated in ° Kelvin, as the user is not required to subtract a large constant voltage from its output to obtain convenient Centigrade scaling. The LM35 does not require any external calibration or trimming to provide typical accuracies of ±1⁄4°C at room temperature and ±3⁄4°C over a full −55 to +150°C temperature range. Low cost is assured by trimming and calibration at the wafer level. The LM35’s low output impedance, linear output, and precise inherent calibration make interfacing to readout or control circuitry especially easy. It can be used with single power supplies, or with plus and minus supplies. As it draws only 60 μA from its supply, it has very low self-heating, less than 0.1°C in still air. The LM35 is rated to operate over a −55° to +150°C temperature range, while the LM35C is rated for a −40° to +110°C range (−10° with improved accuracy). The LM35 series is available packaged in hermetic TO-46 transistor packages, while the LM35C, LM35CA, and LM35D are also available in the plastic TO-92 transistor package. The LM35D is also available in an 8-lead surface mount small outline package and a plastic TO-220 package.
Features
- Calibrated directly in ° Celsius (Centigrade)
- Linear + 10.0 mV/°C scale factor
- 0.5°C accuracy guarantee able (at +25°C)
- Rated for full −55° to +150°C range
- Suitable for remote applications
- Low cost due to wafer-level trimming Operates from 4 to 30 volts
- Less than 60 μA current drain
- Low self-heating, 0.08°C in still air
- Nonlinearity only ±1⁄4°C typical
- Low impedance output, 0.1 W for 1 mA load
LIST OF COMPONENTS USED
- R1 9.1 K Ohm
- R2 1 K Ohm
- R3 18 K Ohm
- D1 IN4148
- D2 IN4148
- IC1 LM 35
- Battery 9 V battery with a battery snapper


There have been many great Electronis engineers in INDIA , I think you R one of them . No one has tried to lern us like U ! W e R getting encurraged by your blog containing electronics knowledge ! Thanks a lot !
LikeLike
Its my pleasure sir. I just want many people to get benefited out of my blog. Teaching makes us a better learner, so I continue to teach through my blog. Its really heartening to see people being benefited out of my effort. This is a great source of motivation, thanks a lot sir.
LikeLike
Greetings from Carolina! I’m bored to tears at work so I
decided to browse your site on my iphone during lunch break.
I really like the info you provide here and can’t wait to tke a look when I get home.
I’m shocked at howw quick your bllog loaded on my cell phone
.. I’m not even using WIFI, just 3G .. Anyhow, wonderful blog!
LikeLike
I think this is among the most vital info for me.
And i am glad reading your article. But want to remark on some general things, The website style is great, the articles is really nice
: D. Good job, cheers
LikeLike
Great post, thanks for this information….
LikeLike
There’s certainly a lot to learn about this subject. I like all the points you’ve made.
LikeLike
This web site is really a stroll-through for the entire information you wished about this and didn’t know who to ask. Glimpse here, and also you’ll undoubtedly discover it.
LikeLike
Thank you, I’ve recently been looking for information about this topic for a long time and yours is the greatest I have discovered so far. However, what in regards to the bottom line? Are you sure in regards to the supply?
LikeLike
Really nice style and design and excellent subject material, nothing else we require :D.
LikeLike
Pingback: lose weight with 1200 calorie diet
I was highly pleased to acquire this web-site.I wanted to thanks for your time for this amazing read!! I surely enjoying each and every little bit of it and I have you bookmarked to take a look at new stuff you blog post.
LikeLike
Can I just say what a relief to acquire a person who essentially knows what theyre talking about on the internet. You unquestionably know methods to bring an issue to light and make it imperative. Even more many people must read this and recognize this side of the story. I cant believe youre not even more preferred due to the fact you absolutely have the gift.
LikeLike
great issues altogether, you simply received a new reader. What might you recommend about your publish that you made a few days ago? Any positive?
LikeLike
Thanks, and which post are you talking about, can you be a little more specific.
LikeLike
I’d always want to be update on new content on this web site, saved to bookmarks!
LikeLike
You can even click on follow to get new posts directly delivered to your mail
LikeLike
I was highly pleased to acquire this web-site.I wanted to thanks for your time for this amazing read!! I surely enjoying each and every little bit of it and I have you bookmarked to take a look at new stuff you blog post.
LikeLike
I’m commonly to blogging and i honestly appreciate your content. The post has certainly peaks my interest. I am going to bookmark your web site and keep checking for new data.
LikeLike
I simply want to tell you that I am new to blogs and absolutely savored your web-site. Likely I’m going to bookmark your blog . You amazingly have amazing stories. Many thanks for revealing your web-site.
LikeLike
Very very good web site thank you so much to your time in writing the posts for all of us to learn about.
LikeLike
Do you accept “applications” for official letter writers?
LikeLike
Yes surely, you can mail me for any more queries at shriramstrong@gmail.com
LikeLike
Nice! Is it possible to find a casing for this?! That will make it complete wont it?!
LikeLike
Yes surely there can be a casing made for this, but i wanted to continue with this project more longer in fact i wanted to add a display screen for this, like SSD [Seven Segment Display] so that there is no need to connect the circuit to a Digital Multimeter to read the temperature.
Once its done, then there can be a casing done for this, just like the way i have created for the LED lamp.
LikeLike